Band Shoppe - flags Band Shoppe: flags - All Post

Top Social

Image Slider

Showing posts with label flags. Show all posts

DCI 2017 Year in Review by Guest Music & Marching


DCI 2017 Year in Review Guest Blog

It's our great privilege to have Zach Ashcraft, founder of Music & Marching, share his perspective of the 2017 DCI Season with us in this guest blog post!  Music & Marching is a blog that exists to tell the unique stories of those watching, facilitating and performing in the Marching Arts activity, in hopes to garner a deeper respect and appreciation for what goes into each performance.

From the dynamic photography to his unique perspective, we are so thankful to have this opportunity to share Zach's "DCI 2017 Year in Review" with our readers and followers! When you have finished reading, be sure to go to MusicAndMarching.com for other stories and interviews that took place during the season. Also, you can follow Music & Marching on Facebook and Instagram (@MusicAndMarching)


*All images in this blog courtesy of  Zach Ashcraft, Music & Marching*


DCI 2017 Year in Review

2017 marked another incredible year for Drum Corps International. Along with setting new attendance records, this season brought with it some of the most innovative shows and concepts the activity has seen in years.

Crowds fill Lucas Oil Stadium at DCI World Finals

Boston Crusaders Performing Wicked Games

Santa Clara Vanguard Guard Performs at Lucas Oil Stadium

This summer marked my 10th season of involvement within DCI. From my first 4 years as a performer with The Blue Stars, to a few years on staff with the Crossmen, and now as a freelance photographer, I’ve witnessed an incredible amount of change over the last decade, both on and off the field.

Members of the Blue Stars perform at DCI FinalsVisual Identity Shakeup

The most notable change of this era, in my opinion, has been the visual identity of each corps from year to year. In generations past, many corps wore the same uniform over the course of multiple decades, with slight updates or adjustments coming every few years or so. More recently, Corps have increased both the frequency and scope of uniform changes, with many groups presenting audiences with drastically new looks on a now yearly basis.

Blue Devils brass perform at DCI Finals

Carolina Crown brass performs at DCI World Finals

While some critics believe this has diminished the visual identity of each corps, many within the activity agree that it allows designers to create a more cohesive program that more clearly communicates the concept of a show. Several designers are taking advantage of this new found creative freedom. Something as simple as The Bluecoats decision to forgo helmets in 2016 has already had an impact on the activity just a year later.

Several corps opted to perform without headgear this year, and its had a huge impact on the way that both audience members and the performers experience the performance. Having a clear view of each performers face not only allows the audience to better feel and experience the emotional content of each show, it allows brass members to explore new avenues of expression and performance not available to them.

Santa Clara Vanguard brass performs at DCI World Finals

Blue Devils drumline perform at DCI Finals

Not all corps have taken this route, however. Many have chosen to keep their shakos, aussies, and helmets, and have found creative ways to adapt them with their new uniforms. The Phantom Regiment, for example, had two helmets to convey different emotions throughout their show. The Boston Crusaders had an entirely new look, and the shakos and uniforms themselves perfectly personified the story their show was trying to tell.

Phantom Regiment corps walks off the field at a DCI performance

Boston Crusaders' drumline performs at DCI World Finals

From new uniforms, to innovations in electronics and prop staging, the last several seasons have indeed been wrought with change. One thing that has remained constant since my first day in the activity though, is far more important than what the corps are wearing.

Boston Crusaders ending their show with a show-stopping flame

Final Goodbyes

Standing in the Lucas Oil Stadium parking lot following each corps final performance of the season, I was reminded that the true importance of this activity goes far beyond what happens on the field. Watching as the performers walked out of the tunnel with tears streaming down their faces, embracing their fellow corps members one last time was a powerful reminder that design trends may come and go. But the one constant in Drum Corps is the life-changing affect each tour has on the individuals who participate in it.

Members of the Blue Knights say goodbye after their Finals performance

Members of the Blue Stars huddle after their 2017 Finals performance

Members of the Crossmen hug as they say goodbye after their 2017 Finals performance

Everything comes to a screaming halt at the end of DCI Finals Night. With the design process for most corps 2018 programs already well underway, the 2017 season will soon be left in the history books. But the one thing that will always remain are the friendships and families formed during those 85 days.

The Boston Crusaders salute to the end of their 2017 season


- Zach Ashcraft, Music & Marching


Flag Basics / Installment 4: Pole Weights

This is installment number 4 of our Flag Basics Series, to check out all of our flag posts Click Here.

Flag Basics / Installment 4: Pole Weights

Our team is asked fairly often about flag pole weights - what are they and are they necessary. In this post, we'll give you the basics, show you a few available options, and give you some tips on how to safely use your pole weights.

Remember: There are no real hard and fast rules for balancing your pole. Pole weighting really varies from person to person, group to group, if they even choose to do so. These are simply guidelines to help take some of the guess-work out of weighting your poles.

That said, let's get started!

What are pole weights and what do they do?

Pole weights, are exactly what they sound like, weights that you add to your color guard flag pole. These weights may come in the form of carriage bolts, specialized "jam" weights, PVC inserts, or even rolls of nickels and quarters taped inside the ends of the poles.

Weighting your pole helps the flag rotate in the air when executing tosses. The drag from the fabric moving through the air causes the pole to slow down and not really go anywhere. Adding some weight to the top of the pole helps it to make the full rotation and come back down. Adding additional weight to the bottom of the pole helps to balance it out a bit – having just weight in the top can cause wobbling if the weight is more than 2 inches.

How much weight to add, if any, all depends on your choreography, what kind of flag your group is using, and whether you are spinning into the wind like during the outdoor marching seasons. If your group doesn't do many tosses during your show or are spinning during the winter guard season, you may find it completely unnecessary. Likewise, if your flags are very lightweight, as with budget flags or digital silks, you may find that you do not need to add any weight to balance your pole. However, if you're using a more intricate show flag that contains plenty of seams, or larger swing flags, you may find that it takes a fair amount of weight to get your pole perfectly balanced.

Safety First!

The biggest concerns with using weights are having them fly out of the pole and hitting someone or something. This happens fairly often... To prevent damage to property and other people on the field or floor, taping is key. You will want to tape your preferred weight into the end of the pole using electrical tape, add a high-quality rubber crutch tip (such as the 58561), and then tape your crutch tip in place.

If you begin to hear your bolt clanking around in your pole, it may be time to re-tape your weight. If it's still making a bunch of noise, try wrapping with some foam and/or tape around the bolt.

So what weight system works best?

It's all a matter of what works best for your group. Will, color guard instructor and a member of the Band Shoppe Sales Team says, "I've spent years trying different things and have used everything from nickels and quarters taped together, to washers stacked up, to a bolt and washer, to carriage bolts, to no weights at all. It really just depends on the person and/or group and what they want. I try to discourage people from thinking that unweighted poles are “bad” or “wrong” because it’s not. If you don’t do a lot of tosses, then you don’t need much additional weight and that is okay."

There are basically 2 kinds of weights:
  • Aluminum Flag Weights - Used with aluminum flag poles, the weights are also called stack weights or "jam weights" because they are jammed into the end of the pole for a permanent to semi-permanent fit
  • Carriage Bolts - Typically available in 1-1/2", 2", 3", and 5" lengths. Carriage bolts may be the most popular way to weight your flag because you have more control to pick the exact combination of weight needed for your flag and choreography needs.

Determining the size of your weight:

The amount of weight needed for your flag will depend on a few factors.
  1. The size and weight of your flag
  2. Your choreography and how much equipment-work your group performs
  3. Wind conditions (in outdoor performance situations)
  4. Personal preferences
The only way to find the perfect weight for your situation is to experiment. Try a few different combinations of weights in a couple of different poles. A good starting point for experimenting with weights is to choose a carriage bolt in the top of the pole that's about 1/2″ longer than the bolt in the bottom end of the flag. For example, a 2″ long bolt in the top with a 1 1/2″ bolt in the bottom. Then, toss & spin through difficult sections of your choreography to determine which feels the best.

Tape, tape, tape, aaaand a little more tape...

Now that we have all that out of the way, we're ready to install our weights. We've put together this handy, printable guide help get you started! Click Here for the PDF version.

Here's what you'll need: 2 Rubber Crutch Tips, Your Pole Weight of Choice (we are using a Carriage Bolt for this example), A Flag Pole (whatever size you wish), Scissors, and Plenty of Electrical Tape.
How to add pole weights to your color guard flag pole


#BandShoppeLove Oak Ridge HS Color Guard

We love hearing from our customers!


Congratulations to Oak Ridge High School Color Guard on a fantastic year, winning second place in their class, and the second highest score of the day at their September 24th competition! The guard ended their season with their best run of the year and looked fantastic doing with their Band Shoppe customer uniforms and flags.

#BandShoppeLove Oak Ridge HS Color Guard
photos courtesy of Oak Ridge High School Color Guard

We are LOVING these costumes! Thank you for such wonderful products and service! Working with Will was absolutely fantastic and we can't wait to do it again!


Thank you so much for your kind words and for sharing your experience with us – we look forward to working with you all again in the coming winter guard season!


We love hearing from our customer! If you would like to have your group featured on the Band Shoppe Blog & Social Media, post your pictures to Facebook, Twitter, or Instagram, tag us and use the hashtag #BandShoppeLove!


Flag Basics / Installment 3

If you've not read Parts 1 & 2, of our Flag Basics Series, then you can check them out part 1 here and part 2 here. Today, we are going to go over Spirit flags and Battle flags.

Flag Basics / Installment 3


Spirit flags and Battle flags are a fun way to incorporate the crowd into any game or pep session! Choose one of our designs or create one of your own. Whether you are going for a more traditional look or a modern design, if you can dream it, we can print it!

So, what’s the difference between a Spirit flag and a Battle flag?

Size! Spirit flags measure 36” x 54” and are recommended to use with a 6’ pole (VE102).
Battle flags (pictured above) are much larger at 58” x 80”, so go for the 10’ bungee pole (VE225).


Is that the only difference? Yep, that's it!
Here are some features that you’ll enjoy with either the Spirit or Battle flag:
  • Vibrant colors – Printed with the highest quality inks, our flags sport 100% front saturation and 99% back saturation. 
  • Durable fabric – Quality is a must at Band Shoppe. That’s why all our flags are made of the highest grade Poly China Silk! 
  • Machine washable – Dirt happens. Our flags are made to handle that! Just toss them in the washing machine on a delicate cycle in cold water. Mild detergent can be used if necessary. Tumble dry low or no heat and remove promptly to prevent wrinkles! Forgot to take them out of the drier? No sweat! Just cool iron as needed. 
  • Made in the USA! – Quality that speaks for itself!  
  • 1-year warranty – Backed by Band Shoppe’s warranty against manufacturing defects.
Now that you know a little about our Spirit and Battle flags, how do you get started?

    Flag Basics / Installment 3


    Frequently Asked Questions 

    Q: Is there a minimum order?
    A: No! You can order just one of your design(s), or you can order as many as you like. There are no minimums.

    Q: How much does it cost to get a sketch?
    A: Sketches of your designs and ideas are absolutely free!

    Q: How do I attach the flag to the pole?
    A: You can attach your flag to the pole one of two ways. You can 1) use the hook-and-loop attachments included with your pole and flag purchase or 2) you can tape the flag to the pole. We usually recommend the hook-and-loop method for clean, easy on and off!

    Q: Can I get the letters to read correctly, regardless of which side of the flag I am looking at?
    A: Yes! This is what we call a double-sided flag. We print your flag twice and sew the pieces together, back to back. This will make sure your letters/words read correctly, no matter how you look at it! (Well, unless it’s upside down, that is.  winky ;) )

    Now that you know a little about the flags, which one is best suited for you and your team? Here are some factors that might help you decide which size flag fits you:

    1. Are you looking to spell out a mascot or school initials on each individual flag? Spirit flags work better with larger words or phrases, such as “GO TEAM” or “SPARTANS”. Battle flags are great for school initials, like “NPHS” or “ECC”. Both sizes work great for mascots and school pride. 
    2. Where will you be using these flags? For smaller stadiums, fields, or courts, Spirit flags work great to accent the space. Larger areas can sometimes swallow Spirit flags, so it might work better for your team to look into Battle flags. 
    3. Who will be using the flags? While a Battle flag on a 10’ pole is easily managed by a high school student, an elementary or middle school student could have troubles hoisting it. Opt for a Spirit flag if your bearer is of small stature. 


    You’re all set! You know the in’s and out’s of Spirit and Battle flags! So what's next? Give us a call to get started on your own design! Our friendly sales staff is happy to assist in creating your very own customized flag.

    Be sure to check out designs online and in the catalog for inspiration at bandshoppe.com!


    Flag Basics / Installment 2: Size Matters

    If you read Part 1, you know that we talked a little bit about the Do's and Don'ts of flag design. Today, we are going to go over a few basic tips on selecting the right size pole for your flags, and the right size flags for your group.

    Flag Basics / Installment 2: Size Matters
    Forest Park Marching Rangers - 2012


    Of course there are exceptions, and while you are free to utilize any flag dimensions you wish, these guidelines will help ensure your group maximizes the effectiveness of your flags on the field or floor. And of course, you’ll find a successful group that does exactly the opposite. Remember: there are no real hard and fast rules.

    With flags, it's go big or go home! 

    Well... mostly.

    You want to make sure the size isn't so big it that becomes too cumbersome to spin. Remember, the larger your flag, the longer your pole should be. Most high school groups can easily handle 6 ft poles, while younger groups may need shorter poles. Typically, most high school groups use 5 ft to 6.5 ft poles.

    Once you know big your pole is, you can move on to flag sizes!

    Flags Sizes

    The number on the left is the header length (sleeve), and the number on the right measures the width of the flag at its furthest point, including 3" for the width of the header.


    Flag Basics / Installment 2: Size Matters


    5 foot pole – 30” x 46”
    5.5 foot pole – 33” x 50”
    6 foot pole – 36” x 54”
    6.5 foot pole – 39” x 58”
    7 foot pole – 42” x 60”
    7.5 foot pole – 45” x 64”


    The idea behind these dimensions is that the flag should cover about half of your pole, this should help with balance. The flag sizes recommended above may be a little on the large side, experiment with different size combinations, see what works best for you and your group. Band Shoppe's Budget Flags are a great, inexpensive way to test common sizes and shapes.

    Band Shoppe's line of custom flags are always made in the USA and are constructed using field tested techniques that ensure a superior product, hands down. Our free design service, including full color sketches and a quote packet, helps you visualize the end result. Band Shoppe's team of friendly Sales Staff and help you along the way, choose one of our in stock or custom designs shown on our website, work from your original drawings, or let our team create one for you.


    Flag Basics / Installment 1: The Dos and Don'ts

    Hi, friends! The blog team and I decided to do a post celebrating some of our favorite tips and tricks for flag design... we quickly realized it would take more than just the one post to cover everything. So, I've broken it all down into some easy installments!

    Flag Basics / Installment 1: The Do's and Don'ts of Flag Design
    photo courtesy of The Boston Crusaders


    Let me first preface this by saying that for every item listed here, you’ll find a successful group that does exactly the opposite. There are no real hard and fast rules to great flag design.

    Ready to get started? Great!

    1. DON'T be afraid of color!

    Flag Basics / Installment 1: The Do's and Don'ts of Flag Design
    'Chilled Brights' from Design Seeds
    Let's face it, color can be a little intimidating if it doesn't come naturally to you. Thankful there are tools out there to help. Try a free service such as Adobe Color CC or Colour Lovers to find user created color schemes or schemes based on images you provide. Some sites like Design Seeds will break it down into collections by theme.

    Be sure to consider the mood of the music your are trying to compliment. Contrasting colors can create tension, perfect for a higher energy piece, whereas complimentary color schemes will help soften the mood bringing harmony. Even a vibrant or subtle splash can bring your music to life. Whether you go with a solid flag or a go daring with a pattern that features several colors - the options are nearly endless!

    2. DON'T forget about context

    If flag's job is mostly to help your group entertain the crowd at football games, then a go-to design in school colors could be the perfect choice. But if your flag is intended to compliment a competitive show or exhibition, remember to consider the context in which your flag will be displayed. Think about the field or floor color, your band and guard uniforms, as well as any props. Your flags should bring life to your show, not overwhelm it.

    Visual cohesion is often the downfall of many good ideas – sometimes it is better to keep things simple.

    3. DO start with a sample flag

    A sketch is a great tool to help visualize the final product, but until you see the actual fabrics put together on the field or floor, and give it a spin, you may not know that a design is truly effective (before you commit a lot of time and materials). Samples are a great way to make sure the design, colors, and fabrics look great!

    4. DO consider custom shapes

    Band Shoppe offers ten standard flag shapes including Arc, Rectangle, Arc Curve, Curve, Slant, Teardrop, Shield, Pennant, Triangle, or Swing. But you're not limited to these shapes! We can work with your ideas to create a flag shape to perfectly compliment your show. If you choose a custom shape, remember to get a sample to make sure it spins the way you hope.

    5. DO consider printing

    Digitally printed flags are a great way to save an already lean budget. That 50 piece sewn flag that will accentuate your show perfectly? Print it! Also, consider printing on other fabrics. Along with the standard Poly China Silk, Band Shoppe offers three fabric options for digital flags, Crystal Clear Lame, Iridescent Ice, and Flag Twinkle. These other fabrics are a great way to add texture and shine to an otherwise nondescript image.

    6. DON'T pick just any image for digital flags

    Images with too much detail are going to get lost from the press box. With digital flags, less is often more in the outdoor arena. Instead, go for a bold photo or texture. Think stage makeup, details pop from far away when the they're exaggerated.
    Flag Basics / Installment 1: The Do's and Don'ts of Flag Design
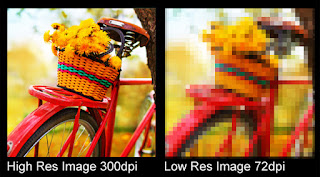
    High Resolution Photo vs. Low Resolution Photo
    Also, remember image resolution. Most images found on a basic Google image search, along with potentially being copyright protected, are just too small. That's why we ask for high resolution images, to obtain better quality printing. In the example, note the crisp detail on the high resolution image. This picture will look very good when it is printed. On the right is a low resolution image like you find on Google. As you can see, its quite muddy, and won't look any better on fabric. So where do you find High Resolution images? Shutterstock is our preferred stock image website – just let your Sales Representative know the image ID, and our design team will do the rest!  Choose either photos or vector illustrations.

    7. DON'T give in to fads 

    Fads come and go, but the tried-and-true options have stood the test of time. Lamés, twinkles, and other novelty fabrics look gorgeous but are prone to damage. Should you choose to use these options, be sure to have a needle and thread handy. Likewise, digital flags are not always the answer. They are an easy way fit a theme, they're lightweight, and do not damage as easily as other options, but they just don't have the same WOW factor as a well designed sewn flag. Consider your options fully before committing to the latest trend.

    8. And finally, DO trust your instincts

    If a pattern, image, or color just doesn't sit well, then it's probably for a reason. Listen to your gut - your first thought is usually your best. Relax and don't agonize over a flag and don't be afraid to ask for help! If you're struggling to find the best option for a song, ask trusted friends, family, or other staff members. Help is always closer than you think.

    Other Helpful Hints

    • White poles are usually a good choice and look nice when using white rifles. If you want more color, Band Shoppe’s Ultra Prop Film is a great option with easy application and a seamless look. If you choose to tape your flags to the pole, use tape that matches your pole or sleeve color. 
    • When using bolts to weight your poles, prevent them from moving around and clanking by wrapping them with foam tape, or consider using DSI’s Pole Weight Anchors.
    • Resist the urge to place an obvious hand check marker on your poles. They look terrible and can detract from the clean, polished look of your performance. Instead, slide a pony tail holder to the desired location and tape over it in the same color as your pole. This gives you a seamless look from far away but gives you a ridge that can be seen and felt. 
    • Use Budget Flags at practice. Your show flags will thank you by looking as good for your last, and probably most important performance, as they do for your first.
    Do you have a favorite flag tip or trick you wish you would have known waaaay sooner? Let us know in the comments!


    Auto Post Signature